Readme File - Gcode Generator for Sequential Digit Engraving - R031410
Abstract -This program writes a Gcode program that enables sequential number engraving (2565, 2566, 2567; or 10972, 10973, 10974, and so on) with parameters selectable by the user. The Gcode program is for use with a CNC controlled engraving unit with XYZ positioning, but the types and sizes of hardware possible are limitless. The Gcode generated is intended for simple 3 axis control (spindle on/off, relay control signals are not currently implemented). The font is a custom plain fixed distance design. The smallest text height is .040", but the upper limit is the capability of your machine. Feedrates are selectable and range from .5 to 30 inches/minute. Engraving 50 units in sequence with under 500 lines of Gcode is possible and quick. The Gcode generated has been tested with Mach3 CNC Software. The program is written in VB6.
Important - it is absolutely essential that the entire read me page is read before attempting to use the output from this program.

Main Program Screenshot
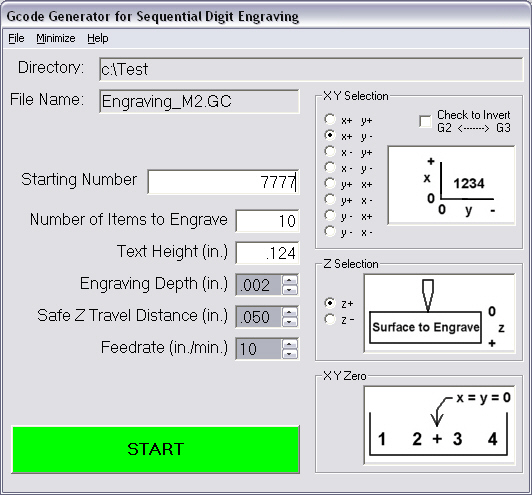
Many items are selectable on this main screen.
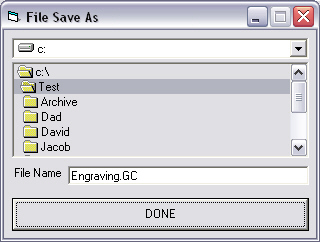
1.) Choose 'File', 'Save As' to change drive, directory and filename information (the File Save As screen shot is below). Certain characters are not allowed in filenames and they will be stripped as they are typed. Other extension endings are possible.File Save As Screenshot
2.) Specify which way your axis motors are setup in relation to the text you are trying to engrave. Display graphs shown above allow XY and Z Selection criteria.
3.) Fill in missing information for 'Starting Number' and 'Number of Items to Engrave'. Only number characters (0 thru 9) are allowed.
4.) Change 'Text Height' from default if desired (the program will round to an even number when run).
5.) Change the 'Engraving Depth', 'Safe Z Travel Distance', and/or 'Feedrate' if desired.
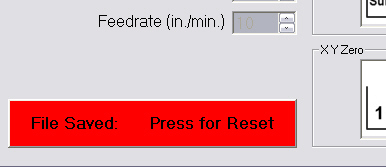
6.) A green START button signifies readiness to write the program. Hit START to write program out to the drive, directory and filename chosen. Once selected, the following 'File Saved: Press for Reset' command button appears signifying completion (see image below).
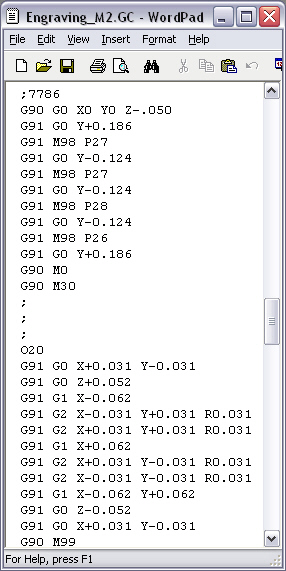
7.) The Gcode program is ready for load and run (see image below).
8.) Important - this program has been tested with Mach3 (Version R1.84.001) from Artsoft. The unipolar stepper motor controller board is from HobbyCNC. If another CNC software program is used, it needs to be able to accept jumps to subroutines. In addition, when proving in the program on any machine, know exactly where your emergency stop switch is and be ready to engage it immediately upon start. Engaging the emergency stop switch right after start is a good thing anyway to make sure the motors are responding in the direction and speed expected. Always perform a first run with the machine empty (not loaded) and the cutting bit turned off, letting it run in free space in the middle of a safe XYZ location, observing the motion from start to finish (being ready to hit the emergency stop switch at all times). If everything appears ok, a part can be loaded for engraving. Keep all people away from any automated machine during operation and wear appropriate protective gear (gloves, safety glasses, etc.).
9.) Important - at the current time, the program does not enable spindle on or spindle off, nor does it use any M3/M4/M7/M8 for relay control. Manual turn on/turn off of the engraving bit is required. These commands can be added manually to the Gcode text file generated by this program with a good search and replace text editor.
10.) The zero point for XY is the center of the text as shown in the above drawing. The Z zero is the point of contact between the engraving bit and the surface being engraved, also shown in the above drawing. When zeroing the Z, it is useful to use a piece of paper or something really thin. Bring the bit down to the paper in between the bit and the surface to engrave feeling for the moment the paper becomes jammed (slowing the travel speed down is helpful). At this point, the Z can be zeroed. Raise the bit and remove the paper. During operation, the program will automatically pull the engraving bit up to the 'Safe Z Travel Distance' chosen earlier before moving to the first character position. Now perform a dry run with cutting bit off, machine not loaded, centered in a safe XYZ location.
11.) After a successful dry run, sequential digit engraving of multiple units is now ready. With your first unit, check to see that the depth is what you'd expect. If not, re-run the program changing the 'Engraving Depth' accordingly and/or check the Z zero position. Placement of the surface to be engraved has to be consistent from piece to piece in order to get repeatable depths across a batch run. Also ensure that the number is readable and in the direction anticipated. Choosing the wrong XY Selection for your machine will result in numbers that are not correct. Inverting the G2 with G3 command is provided on the main form as an experimental option during the troubleshooting of incorrect numbering, but should only be used if 100% certain about the XY Selection of your machine. Having the wrong Z Selection will cause the machine to crash into the engraving surface. At the completion of one engraving, the machine will position the cutting bit to the XY zero zero position, at the 'Safe Z Travel Distance', waiting for the next cycle start command to be issued by the operator. The cutting bit should be turned off so that the next blank unit can be loaded, then turn on the cutting bit and re-start the program for the engraving of the next numbered sequence.
12.) Any substantial slop in the table, leadscrews, couplings, bearings or other may cause undesired quality levels in the symmetry and readability of the numbers. This may be near fixable by the use of backlash compensation inside the CNC program driving the axis motors. Variations in the flatness of the engraving surface will also affect the quality.
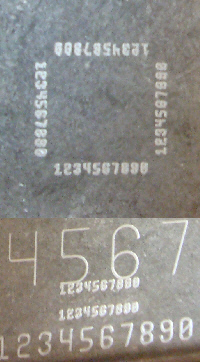
13.) Refer to sample images provided below of actual engraving (the picture does not do the engraving justice). The boxed/small engraving is .040" text height. The big text height is .25". The middle text height is .125". Since the taking of this picture, the depth precision of this setup has been improved over what is shown in the picture below.
Example Engraving Screenshot
GENERAL:
No revisions are planned. This is a demonstration of programs completed.
I put this program together to assist with the engraving of sequential digit numbering of products from years ago. This updated program was used during the 2010 time frame. The capabilities of this enhancement far exceed the first one. It is written in VB6.
The number font is a custom plain fixed distance design and was chosen for simplicity and compactness of the Gcode generated. It is quite easy to engrave 50 units in sequence with under 500 lines of Gcode and in a quick time interval.
A default settings file could be added to the program so the user doesn't have to re-load parameters each time the program is run.
A few vbrun.dll's have been provided (though they may not be needed). Your system may require a different *.dll for this VB6 download to run. Usually, the *.dll can be downloaded free. Do a search for whichever *.dll the program is complaining about, download and install it, then re-try the executable. Multiple *.dll's may be needed.
One final note - the readme file linked inside the program refers back to this web page (this may be added directly to future revisions of the program if pursued, along with other ideas for improvement).
Thank you for your interest in this program!